Please enter your email and website or LinkedIn to receive more information about our free and paid accounts.
Please enter your email address below and we’ll send you instructions on how to change your password.
Digital teching can seem daunting – the pressure on set, file asset management, and mainly Capture One being a beast of a program with the ins and outs that not even the most experienced digital tech fully knows. However, digital teching is relatively simple, and a lot less “techy” than you may think. This post will help you scratch the surface and get down some of the basics of Capture One, from setting up a session to the overall workflow.
Capture One offers two options upon opening – a session and a catalog. A session is what you work in during a shoot. It is where the photos will enter into, become organized, and be editable. A Capture One catalog is essentially a file organizing and storing method for the sessions. You can think of it as a library. When digital teching a shoot, you will always be working in a session.
Set up should be done the day before the shoot. As we all know, time is more valuable than gold while on set, so doing what you can before the shoot is crucial to maximizing your workflow. While preparing, don’t forget to clean your computer and computer screen! Clients and photographers will be looking at your screen all day, and you don’t want to give off the wrong impression of being messy and unclean.
Open Capture One, click create new session and give it a name. Naming the session the shoot name makes the most sense. For example, if you’re digital teching for a holiday product shoot for Staples, the name might be “Staples_Holiday.” If it’s a multiple day shoot, be sure to include the day number, so your name reads “Staples_Holiday_Day01”. Also be sure to change the storing location to your desktop for easy access.
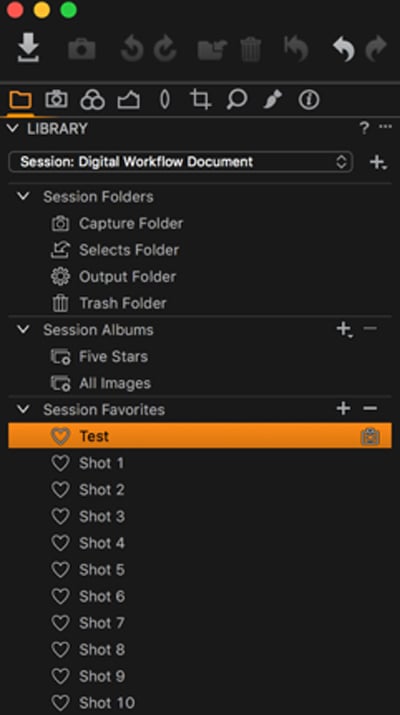
Once your session opens, you’re going to want to create your session favorite folders. These will essentially act as subfolders within your “capture” folder and are very easy to create. To do this, open the session folder you just saved on your desktop > open the capture folder > create 10 shot folders and a test folder. Select these folders and drag them into “session favorite” section in the library tab.
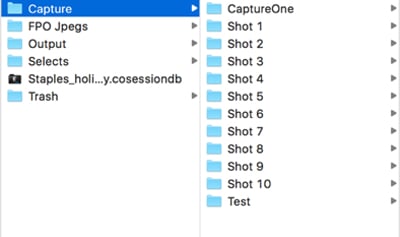
Right click the “test” folder and set it as your capture folder. This selection will add the small camera icon next to the folder, signifying it’s currently selected as the capture folder. When set as the capture folder, all images taken during that time will go into that folder. The test folder is ideal to use for any sample and set up shots. Once the photographer is ready to take a photograph, I switch to the Shot 1 folder.
It’s a good idea to ask the photographer, before getting on set, if they have a particular file naming convention they like to use. Most of them will have a preference, but if they don’t, a safe bet is to use one of the following formats:
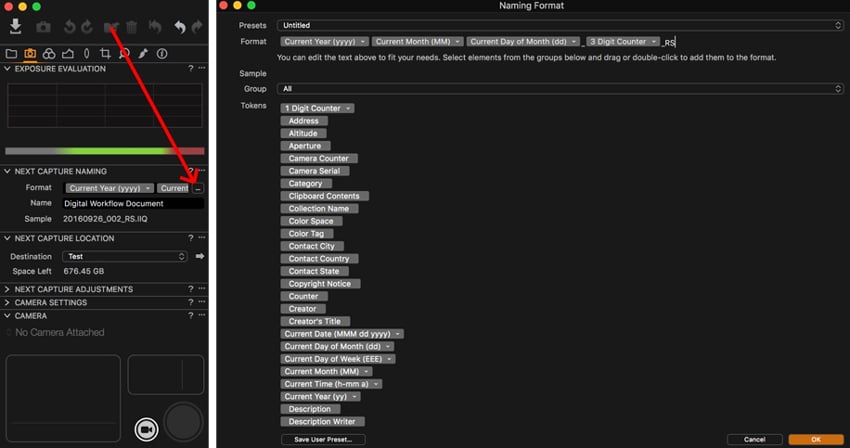
To change the file naming convention, go to the Capture tab (camera icon), click the three dot button in the “next capture naming” section.
Finally, make sure Capture One is set up to be able to recognize all camera types for tethering. Click Capture One 9 > Preferences > Capture Tab > Check all options for camera.
Some basics you’ll need:
The first thing you do when you get on location is set up the hard drives through the Chrono Sync application. This set up is how you will back up the files throughout the day.
The session should be backing up to three places – the computer hard drive (the desktop folder), and two hard drives. Sometimes the photographer will bring their hard drive for you to back up onto as well.
We use a program called Chrono Sync, which allows you to schedule backups to the hard drives so that everything is constantly backing up throughout the shoot. (If you don’t have Chrono Sync, you can back up manually during the shoot, by occasionally dragging the session folder from the desktop onto the hard drives)
Open Chrono Sync and click “create new synchronizer document.” You will need to create one for each hard drive.
Choose the desktop session folder as the source target. Make sure the operation is backing up left-to-right. Then, select a hard drive for the destination target. Now you need to set the schedule for when that particular hard drive will be backing up.
Each hard drive should be backing up every five minutes. To make sure the drives are alternating, have one backing up on 0’s and 5’s (2:00, 2:05, 2:10, 2:15, etc.), and the other on 3’s and 8’s (2:03, 2:08, 2:13, 2:18, etc.). You will schedule this in Chrono Sync by clicking the “add schedule button.”

Follow the set up in the image below. Make sure you click “only run if target volumes/agents are available.” Otherwise, Chrono Sync will be trying to back up even if the drives aren’t connected, and you’ll be left with a lot, and I mean a lot of error notifications.
Check to make sure the syncing is working by opening the drives and making sure the session folder has copied over.
Now you’re ready to shoot. Some things to remember…
Change the capture folder after each shot. So once shot one is done, right-click on test folder and make it the new capture folder while set up for shot two is taking place.
If you make any local adjustments on images, Capture One will carry those changes over to all new incoming images. If you don’t want it to do this, go to the Capture tab > Next Capture Adjustment section > All Other > Default Adjustments.
Sometimes clients will have a tear sheet .png overlay that they want to be placed on all incoming images, so they know how the final product will look. If this happens, make sure to check the images without the overlay as well. Sometimes things will get missed in the shot because the overlay is covering it. For example, there may be visible cords in the shot, but if the overlay is covering them, no one will notice.
There are not too many things you can do in the sense of troubleshooting. If Capture One freezes, the best thing to do is notify the photographer, and restart your computer, which will typically do the trick.
If you notice the hard drives aren’t backing up or have frozen, simply eject the drive, unplug it, and plug it back in. Then, drag the session folder from the desktop into the drive so that you know you have the most current shots.
Sometimes Capture One won’t recognize the camera. The best thing to do in this case is to have the photographer turn off their camera, quit your capture session, open it up again, and turn the camera back on. It sounds simple, but it does the trick.
So you just finished up with the last shot. Hooray! However, there are a few more things the digital tech needs to do before closing up shop.
Drag the session folder from the desktop to all backup drives. This is your final backup, which ensures your backup drives have all of the most current photos.
Typically, the client will want to see FPO files (For Position Only) which are low res JPEGS that they can make selects from and also begin to toy around with for positioning and composition. To prepare these FPO files:
It’s best to save the shoot folder in multiple places. While you currently have it saved on the computer and hard drives, it’s good to have a cloud storage option as well. Consider Backblaze, which is a cloud-based company that backs up your computer and any hard drives connected, with unlimited storage.
Need help with Digital teching? Check out our Consult page or send us an email to learn more.