Please enter your email and website or LinkedIn to receive more information about our free and paid accounts.
Please enter your email address below and we’ll send you instructions on how to change your password.
Lightroom, my favorite image catalog software and raw processor makes organizing and editing images a breeze. It’s a great way to view and maintain your entire archive and make non-destructive edits to your images. Even better, it lets you seamlessly transfer your images into Photoshop for more advanced post-production work. I’ve been using Lightroom for over a decade now and have adopted a simple yet varied workflow to keep files organized and keep workload light, without sacrificing a smidge of quality.
The ever-changing version of Lightroom that we all know and love, Lightroom CC, still contains seven major modules: Library, Develop, Map, Book, Slideshow, Print, and Web. While most photographers are well familiar with navigating the program, this article aims to present a stable and reliable workflow using the Library and Develop modules. While the other 5 modules are useful and fun to have in the same program, Lightroom does not excel in those fields.
Before importing your images, it is important to recognize how Lightroom interacts with your files. Importing files via Add, the preferred technique, will create a reference thumbnail within Lightroom but not an entirely new file. This way, Lightroom is never manipulating the file itself, just referencing it. The most important thing to remember is that if you move your original file, Lightroom will lose its capability to work with that file. You will have to go into your drive and locate the file again.
For this reason, it is important to practice a certain amount of organization within your hard drive before you even touch Lightroom. In order to use multiple computers and keep your catalog portable, one should use hard drives. My suggestion is to split your work into two drives (or at a minimum separate folders), one for personal work and one for client work. Then within those drives, I would create two folders: one titled “Images” and one titled “Catalog.” Within your “Images” folder should be folders listed by the name of your client or the name of your project. Within those folders, I recommend keeping everything organized by date. For example, a folder full of images from March 12th, 2020, would be named 200312 (YYMMDD). Your “Catalog” folder is where your Lightroom catalog files will live (primarily just your catalog and its backup). This way, it’s easy to find and open your catalog. See the image below for reference.

This may seem like a bit much, but it is a simple way to set yourself up for success. Once you import your files to Lightroom, they will all line up just like they do within your drive. This way, flipping through your drive is just like flipping through your catalog — everything is streamlined and easy to access in a pinch.
With that out of the way, let’s open Lightroom and save our new catalog in our previously created “Catalog” folder. Welcome to the library module! This is where your reference thumbnails live in a nice neatly organized grid that can be navigated with ease. The Library Module is the place for viewing, organizing, and rating your photographs, along with adding important information like metadata, copyright, and keywords.
In the bottom left, you will see a big button labeled Import. Within the Import window, you can import your files from any folder on your computer. BUT! Since we are working with a portable catalog (on a hard drive), we only want to import files found on the same drive (that is, those files within your images folder). I highly suggest sticking with importing your files under “Add.” This way, you are just referencing files that already exist, instead of creating new ones and doubling the hard drive space you will need in the end. While importing your files you can also rename them, adjust metadata, and batch process them.
The fastest way to do a preliminary run-through of your shoot once it’s imported is to start with a simple yes or no approach. Is this a strong shot? Is it technically on point? Or, is this not a strong shot? Is it boring? Is the focus off? To do this, put your images in the single frame Loupe mode (keyboard shortcut, “E“) and use the left and right arrow keys on your keyboard to quickly move through your files. Hit the “P” key to pick the shots that work, and watch as the little white flag gets added to the images you like. Use the “U” key to unpick an image that you no longer want to be flagged. Any shots that are clearly not up to par can be rejected altogether with the “X” key, and you can delete them from your catalog later on.
To make this process even more streamlined, Lightroom has a nifty “Auto Advance” option that allows you to move to the next image without even having to touch the arrow keys. To set Auto Advance, go to your top menu bar, go to Photo, and check Auto Advance. Your images will now automatically advance once one has been rated or flagged.
Once you select all the images that are strong, go back to the grid view mode (“G”) and adjust your library filter to show only the images that have the white flag attribute (circled in the screen capture below). If your library filter bar is not showing, you can turn it on by hitting the “key or go to View> Show Filter Bar.

Now that you’re looking at just your selects, go through your edit a second time, still in the Loupe mode (“E”), this time rating your strongest and most commercially viable images using the star system (much like you would in Bridge). Rate only the images that are worthy of a star on a scale of 1-5. To do this, hit the number key for the number of stars you wish to apply. I suggest using 1, 3, and 5 stars, reserving 5 for your most portfolio-worthy shots. Afterward, you can once again adjust your attributes to show only flagged images with a star rating.
Once I have a group of images that have been rated and flagged, I like to take advantage of Lightroom’s Collection feature. Collections are essentially virtual folders that group your images together in your catalog, while never actually moving them on your hard drive. They’re essential for creating batches of images that can be sequenced and arranged for clients, your website, or a promotional emailer.
To make a collection, start by selecting the image candidates you’ll be working with. It could be just your flagged, 5-star choices from before. Then click on “Collections +” to create a new collection. Here’s an example of creating a collection for a promotional emailer.

Name your collection and be sure that the “Include selected photos” box is turned on.

Once your collection is created, use the “Tab” key to hide your workspace panels and give yourself a bigger workspace. You can select all the images in the collection while in the grid view mode “G”, and hit the “N” key to show your images in the Survey mode.
At this point, I like to turn the lights out with the “L” key so that I can view my candidates in a clean, black workspace. And because you’re now working with images in a collection, you’re free to drag them around to sequence and rearrange them for your edit. Deselect the ones you don’t want by clicking the “x” at the bottom right of each image.
Images in the survey mode with the lights out:

After moving some shots around and eliminating the images I’m less inclined to use, I decided to go with these three selects shown below. Again, these images are being selected for a promotional emailer. I’ll delete the rest of the images from the collection, and label it with the date I plan to send them out. And remember, it’s a virtual folder, so deleting in this case only removes the images from the folder, not the catalog.

Lightroom’s Library Module also allows you to create Collection Sets, which are essentially parent folders for Collections. These are helpful when working with multiple sets from the same shoot or when organizing content for the different galleries on your website. I typically use Collection Sets when doing photographer web edits to help organize the projects and specialties for their sites.
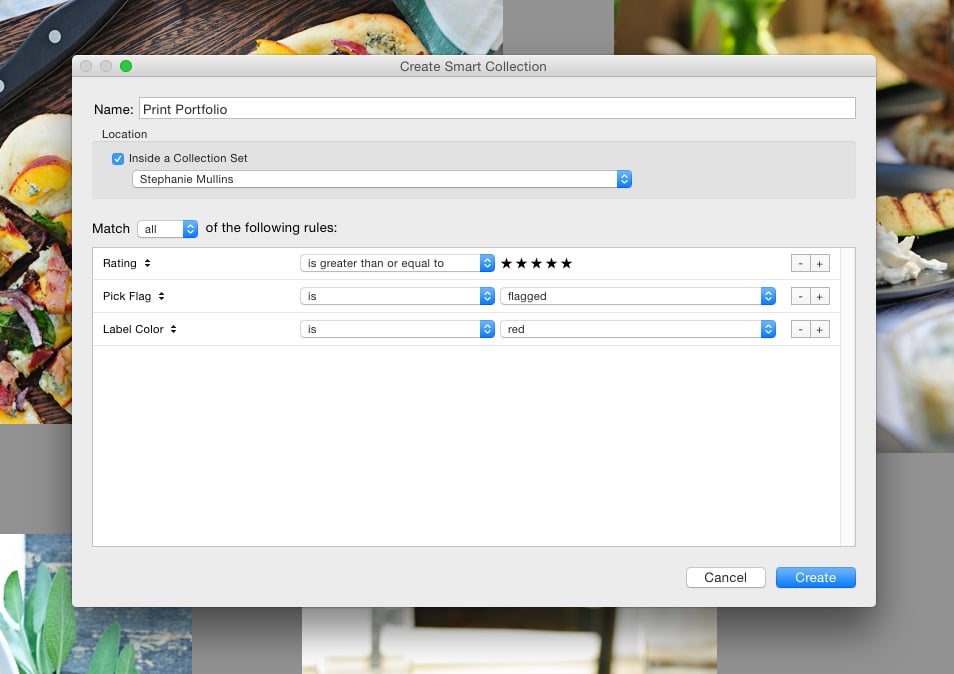
There are also Smart Collections. Smart Collections function just like regular Collections but populate themselves based on pre-determined metadata, ratings, and color codes. One of the best ways to use a Smart Collection is for cataloging your portfolio-worthy shots. For example, any image that has a five-star rating would probably be a good candidate for either your print book or website. But what if you want to be a bit more deliberate with what work automatically gets added here? Add another rating criterion, such as a color code, that you’ll only plan to use when you see a shot that you’d want to use in a specific place. For example, red for print portfolio, green for web, and blue for social media. Lightroom will do the rest and put the work into those collections for you.
You could also make Smart Collections based on specialties. You could color code your work based on specialties and have Smart Collections that auto-populate according to the specialty color and rating (red for portraits, green for lifestyle, yellow for travel). The quick keys for your color codes are the following number keys:
6 — Red
7 — Yellow
8 — Green
9 — Blue
When it comes to processing your images, Lightroom lets you make basic preliminary adjustments right inside the library module with the quick develop panel. Of course, these tools won’t give you much subtlety. I suggest going into the develop module the moment you feel the urge to adjust an image.
Within the Edit module, I like to work my way from top to bottom. In the “Basic” box I start with white balance, then I try to open shadows and suppress highlights while bringing the exposure up. I tend to bring the exposure up as I tend to underexpose. I do this since shadows are easier to reclaim than highlights (fun fact: the opposite is true for black-and-white film photography). Next, I add a little clarity and vibrance while dehazing only if necessary. I never add saturation or texture. Practice a light hand when adding clarity (things can become garish very quickly).

Moving on, I avoid the “Tone Curve”, preferring to make curve adjustments in Photoshop, where I have more control. I only make “HSL” adjustments if I want to manipulate a specific color significantly. It is sometimes necessary to do this in Lightroom as certain results are only possible while working on the raw file. For the most part, I steer clear of HSL. The same goes for “Split Toning”, this tool is primarily for black and white photography, but even then, I prefer to split tone in Photoshop.
The “Detail” box is relatively important as you will want to practice pre-sharpening on the regular. I usually up the amount of Sharpening just enough to notice it. Once I can see a slight difference when I turn it on and off, I stop — any further and the file will fry out, any less and the file will look fuzzy or even out of focus. I wish I could give an exact number, but this is best done by feel. I suggest playing with the Luminance slider if your pictures are noisy…but don’t go too far as luminance can make your image look like a Monet painting pretty quickly.
Sometimes it is important to adjust Lens Correction to correct for a lens vignette and Chromatic Aberration. I click remove chromatic aberration on every photograph I edit and try to synch the lens profile for the lens I used. Transform is important if your photograph is missing straight lines or if you are shooting with a lens that creates a lot of distortion (i.e.: a photograph of a building taken with a wide-angle lens). I highly suggest staying away from Effects and Calibration. Simply said, Effects tend to be tacky and Calibration tends to be more of an advanced, generally unnecessary feature.

Editing can be synced from one image to the next. Simply make your adjustments to one image, move on to the next, then hit previous at the bottom right to apply the same edits. Or, highlight the entire folder and apply a synch to a limited slider selection. For example: if you know you shot everything on a generic white balance and you want to dial in the balance across the import, just adjust one image, select all the images in the folder or collection, then synch just the white balance.
Once all my image editing is complete, I like to use my favorite quick key ever, the “ ” key. This is your before and after preview key for image editing in the Develop Module, and I suggest using it throughout your editing process to see how far you’ve taken your image—and if it’s been taken too far.
When you’re ready to move to Photoshop, go to Photo in the top menu bar or right-click the file and select Edit in Adobe Photoshop. Work your magic in Photoshop, hit “command S” to save your adjustments, navigate back to Lightroom, and see your filename-edit.tif version next to the original in your catalog. You can even open your image as a smart object if you want full manipulation capabilities.

Here are a few helpful quick keys for working in the Develop Module:
Command + ‘ (apostrophe): create a virtual copy of an image so that you can play around with multiple processing styles, crops, and variations.
Tab: hides/reveals the side panels to provide a larger work area.
Command + ‘ (apostrophe): create a virtual copy of an image so that you can play around with multiple processing styles, crops, and variations.
L: “lights out,” dims the surrounding image area.
T: hides/reveals the toolbar.
Option + P: Preview in Browser
I: show or hide info overlay
Check out the rest of Adobe’s helpful shortcuts here.
That’s it! Hopefully, these tips will allow you to make your Lightroom process even smoother. And remember anything that will improve your database organization, speed up your workflow, and make editing more streamlined will surely allow for more time behind the camera and less time in front of the computer.
Questions? Give me a shout! And if you’re interested in helping with an edit of your own, I’m happy to help.